Photo by ryanoshea.
Make your website awesome with Shareaholic. Get our free tools now.
Let’s be real. When most of us started our first blog, we didn’t sign up to learn how to code—I know I didn’t. I was excited to express myself, learn a ton and maybe even get a job out of it.
Once I joined Shareaholic and began blogging more often, I realized that I needed to get myself in gear and learn some basic HTML. And here’s a reality check: you do too. No matter how many pageviews you have, having an understanding of HTML is key to having a successful blog.
Need to force an image to stay on the right of your post instead of drifting to the middle? HTML.
Need to install analytics to track your success? HTML.
Don’t want to bother your web designer with the small stuff? HTML.
You don’t need to be a coding genius to rock your blog, but you should have a basic understanding of the terminology and a few tags up your sleeve to take your blog posts to the next level.
Understanding HTML
Before we get into the tags you need to know, I wanted to give you a quick intro into some general HTML terminology and structure. This way, you’ll understand what I’m talking about later in the post once we get to the top tags you should know.
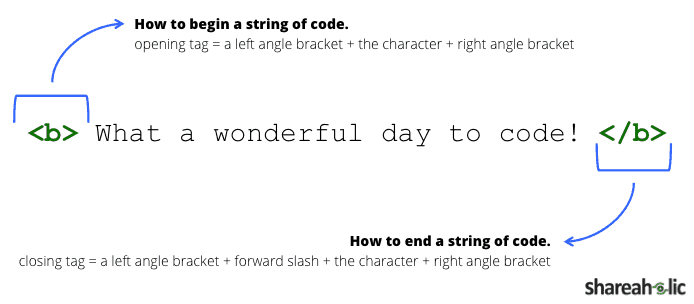
Opening and closing tags
In any piece of code, there will be an opening and closing tag. The opening tag starts off the sequence with a left angle bracket, a character (or two) signifying what the tag is supposed to do, and a right angle bracket. A closing tag ends the sequence in the same manner—it looks just like the opening tag, but it has a forward slash before the character. Here’s a visual breakdown for you:
Include the object or text you want to modify in between
Think of opening and closing tags like a container for content. The opening and closing tags surround all the elements they are modifying—anything in that “bucket” of HTML will obey the rules of the opening and closing tags.
It’s very important to understand what opening and closing brackets are and how to place elements in between them when you first start to understand code—they give you a reference point for what’s happening in the code. You’ll also be a pro at copying and inserting any code on your blog since you have an idea of where code starts and stops.
X HTML Tags You Should Know
1. Site structure
<head> </head>
This tag is at the top of the page. In between these two brackets, you’ll see information about the page (including the page title) any analytics you have installed, and theme styling code for the rest of the page. Think of this section of HTML as the description of your page.
<body> </body>
Everything between these two tags appears in the body of your webpage—aka, what your readers see whenever they visit your site. All of the HTML code for your post and any widgets that people can see directly go here.
Note: You don’t have to paste these tags in your post—they are part of your site structure already.
2. Organize with headings
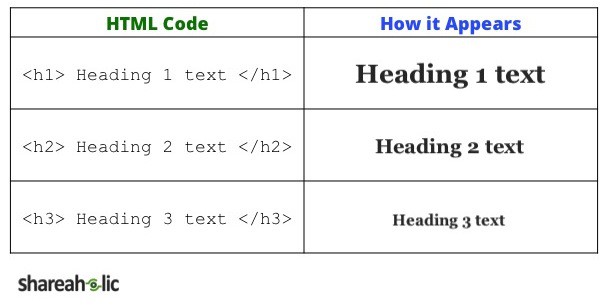
We’ve talked a lot about the importance of using headers in your blog posts. They’re a great way to break up your text, making it easy to skim and understand. There are three different sizes of headings: H1 is the biggest, H2 is the second biggest, and so on. I’d recommend not using more than two different types of headers in your posts because having too many becomes distracting to readers.
3. Create links
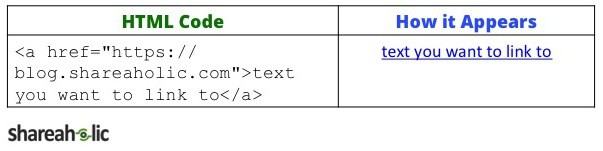
This is probably the most important tag for a blogger to know–readers expect bloggers to include relevant links in their posts. Place the link you want to use in between those quotation marks in the opening tag and you are good to go.
4. Embed images
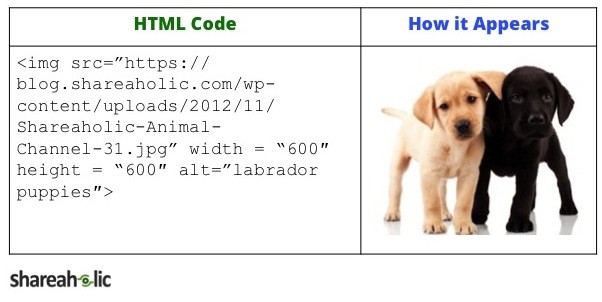
This is probably the second most important snippet you should know. Whether you’re sending an email to your blog subscribers or putting together the most pinable post ever, using HTML for images is important. Notice that you should include the link to the image itself, the size of the image in pixels and then the alt tag. The last part is especially important for SEO purposes.
5. Link images
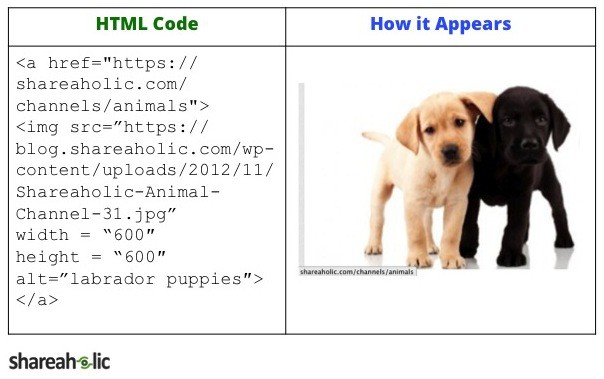
Now, to make an image a link (like our CTA at the bottom of this post), all you have to do is surround the image code from step #4 in a the code for a link (step #3)–basically you are replacing the “text you want to link to” text and inserting the code for embedding images.
6. Align images and text
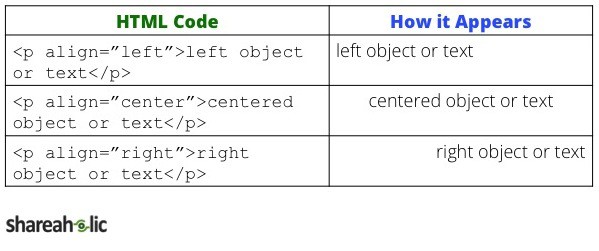
There are few things more frustrating than when an object won’t align the way you intended it. No matter how many times you click the alignment buttons, the image or text stays stuck a different way. To specific a certain alignment, include <p align=”left”>before the thing you want to align and </p> after.
Note: Most people recommend using CSS, the language used to style your blog, to align aspects of your site. While this is generally a good rule, I’d recommend using the above alignment codes when you’re trying to fix a specific object that isn’t properly aligned already.
7. Blockquote
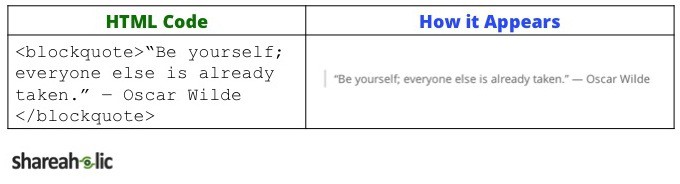
A great way to spruce up the formatting of someone’s quote with HTML is with the block quote. This snippet of code styles the quote differently than the rest of your body, making it clear that someone else said or wrote the that text.
8. Numbers (ordered lists)
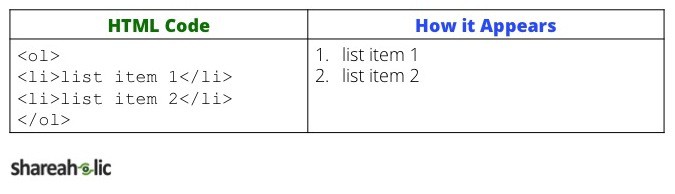
If you want to make a numbered list, this is the tag for you. For all of those top 10 blog post lists, this tag will be your best friend.
9. Bullets (unordered lists)
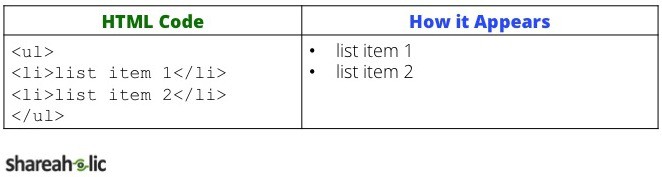
If you want a list without numbers, use this tag. Great for highlighting a few quick points under a main idea in your post, especially if your post is running long.
10. Formatting fonts

Super simple stuff. If you want to make some parts of your post stand out, these tags are essential.
See, that wasn’t so bad! You’ll be a coding wizard in no time.
To our more experienced bloggers—what pieces of HTML do you use daily? What do you wish you knew how to do in HTML? Share your thoughts with us below.